|
White balance within photography is mainly used to help you to change the temperature of the colours to appear more like the naked eye. To measure the white balance the easiest way to look at it is that a candle hits around 1,000k and a clear blue sky measures around 10,000k. K stands for kelvins which is the measurements which are used to measure white balance. Below is a diagram which I have found to explain the kelvin scale.  To show the use of the Kelvin scale within photography I took 5 images using the Lightroom mobile app's presets for white balance which are; auto white balance, incandescent, fluorescent, daylight and cloudy. These are shown below. I have utilised white balance throughout the digital photography unit. For example, when I was doing the seeing in black and white unit, I set the white balance to daylight which is around 5500-6500 kelvins. Also, when I was doing the food photography, I had to change the white balance accordingly due to using continuous lighting. References:
Kun, A., n.d. White Balance | Understanding White Balance in Digital Photography. [online] Exposure Guide. Available at: <https://www.exposureguide.com/white-balance/> [Accessed 17 March 2022].
0 Comments
Comparing Paid v Free Editing SoftwareFor my paid software I used Adobe Lightroom Classic and for my free editing software I used BeFunky.  The image I decided to edit in the free and paid editing software. As a photographer, my go to software would be the adobe suite. This is generally because it has a wider range of functions that you can do in comparison to the free packages. That being said, for someone that wants to edit an image for social media, I can understand why it would be easier and cheaper for them to just use free editing packages. Adobe Lightroom Classic As you can see above I edited the image that I chose using Adobe Lightroom Classic. For any software, there will be pros and cons. So first of all I will talk about the good points of adobe lightroom classic. There are a few things which stick out to me in regards to Adobe Lightroom Classic with that being that there is an ability to use masking to manipulate the images. This is a function that you will not really find in free software due to the complex nature of the task. Moving along nicely to the fact that you can batch edit in Lightroom Classic which is ideal for professional photographers that want all of their images to be consistent. For example, a wedding photographer may use Adobe Lightroom Classic to change all of their photos to black and white at a clients request. This being said, the packages are non user-friendly meaning that someone that has never seen any adobe packages would be overwhelmed to even try to edit using the adobe packages. I know I was and I sometimes still am. In addition, the cost of the adobe packages can be an issue making those on a low income unable to access these packages. Below is the image post-production.  BeFunky As you can see above I edited the image that I chose using the online version of GoFunky. Straight off the bat, there is a positive point about using GoFunky and that is being that it is easily accessible to anyone that has an internet connection. Another positive point is that Go Funky is very user-friendly in the video above was the first time that I have used GoFunky and it was an easy pleasurable experience.
This being said, I have to remember all of the cons about the software from my own point of view. I will list these below:
Conclusion Taking all of this into consideration, I personally will still use Adobe Lightroom Classic. But, for other members of my family I will recommend GoFunky for them to use. I found that both Lighroom Classic and GoFunky had their own pros and cons, but if it was a fight between the two Lightroom Classic wins by a mile. What is street photography? Streetwork 1993-1999 - Philip-Lorca di Corcia Streetwork 1993-1999 - Philip-Lorca di Corcia Street photography was first used in the nineteenth century when the handheld cameras came around. Eugene Atget was the first ever recorded images that were of the street, they used a format camera. They used to walk around Paris in the early morning when no one is around, the images were at eye view. They used long exposures which meant that there was ghostly shadows. I personally like the work of Philip-Lorca di Corcia, where they took images of people on the street. They tend to take images, of peoples faces using an intense flash. I wouldn't take images using this method as this would mean that I would have to be confident taking images in the street which is something that I am not. However, method wise, I feel like I would like to take images with a similar method to Beat Streuli where they took images from a distance away from the subject using a telephoto lens to allow them to take images close up of strangers. This is something that I would like to do whilst I am on the trip in Birmingham City Centre. Plan:
 New Street 2012-2013 - Beat Streuli For our street photography, we went to Birmingham Town center where we did a photowalk where we could take either photos of architecture or people. For mine I actually took photos of both architecture and people. Below is a contact sheet of the shoot for architecture. Then, it was time to start editing. Which I felt like there was not a lot of editing to do apart from cropping and changes the compositions of the photographs. Therefore below are my images post production.    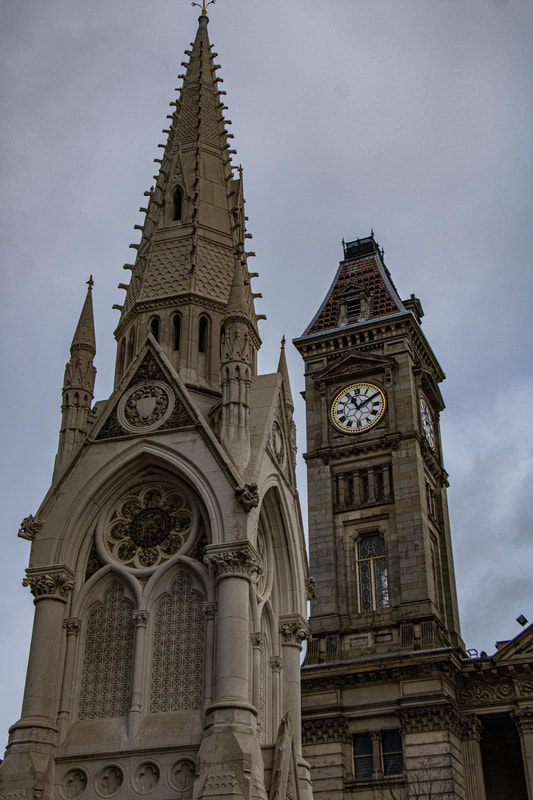   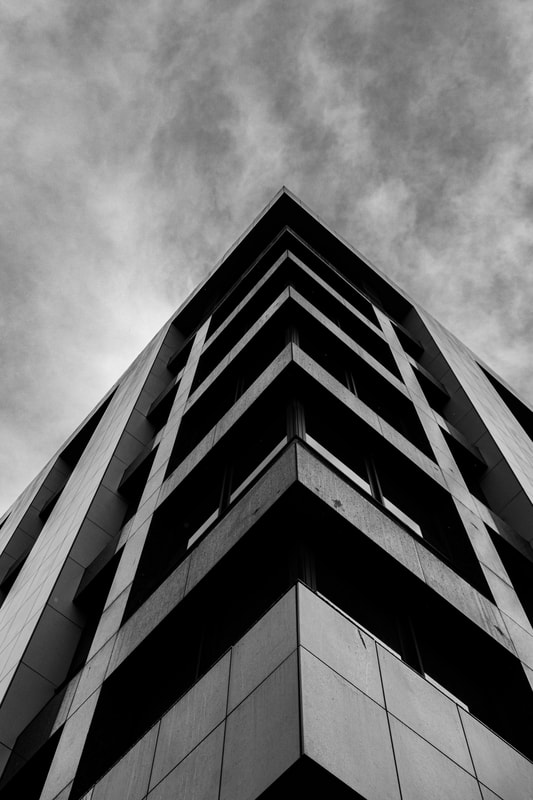      Then we will look at my street photography where I had a heavy focus on people within Birmingham City Centre. Below is a contact sheet of this shoot. Now, it is time to start editing. Taking photos of people was something that I was very anxious about as, it its quite an intimidating thing. But, having the support of the group really helped me to take the initial photographs, allowing me to feel more confident within the shoot. Below is the images post-production.       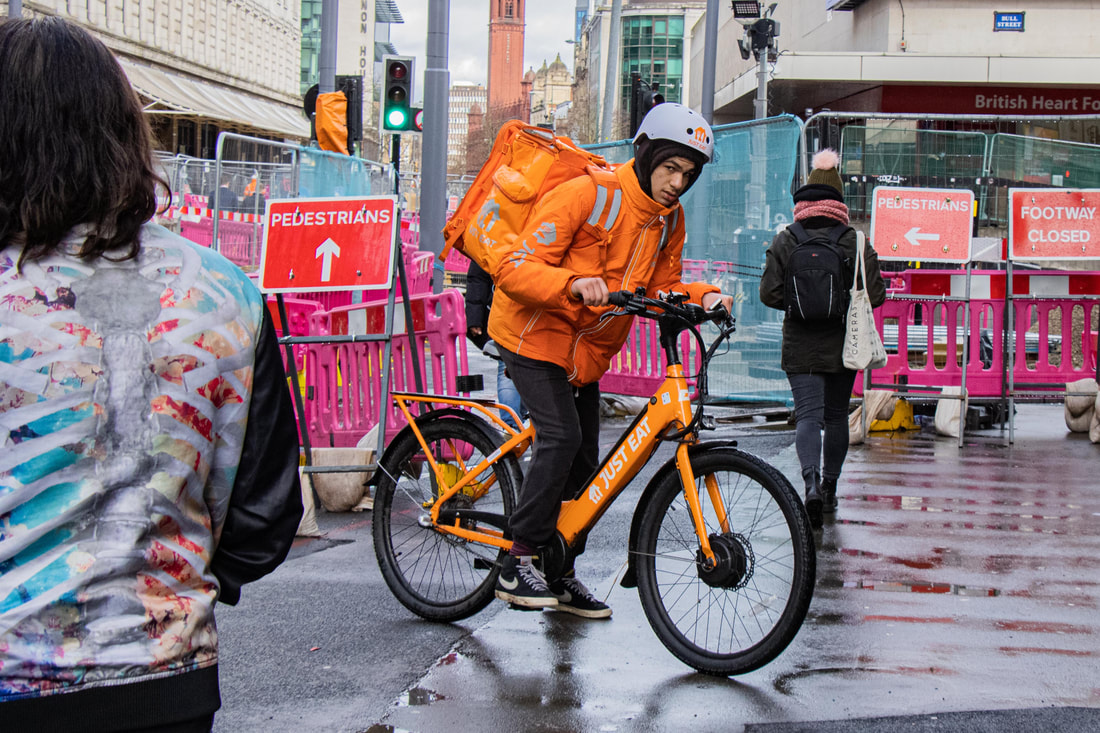  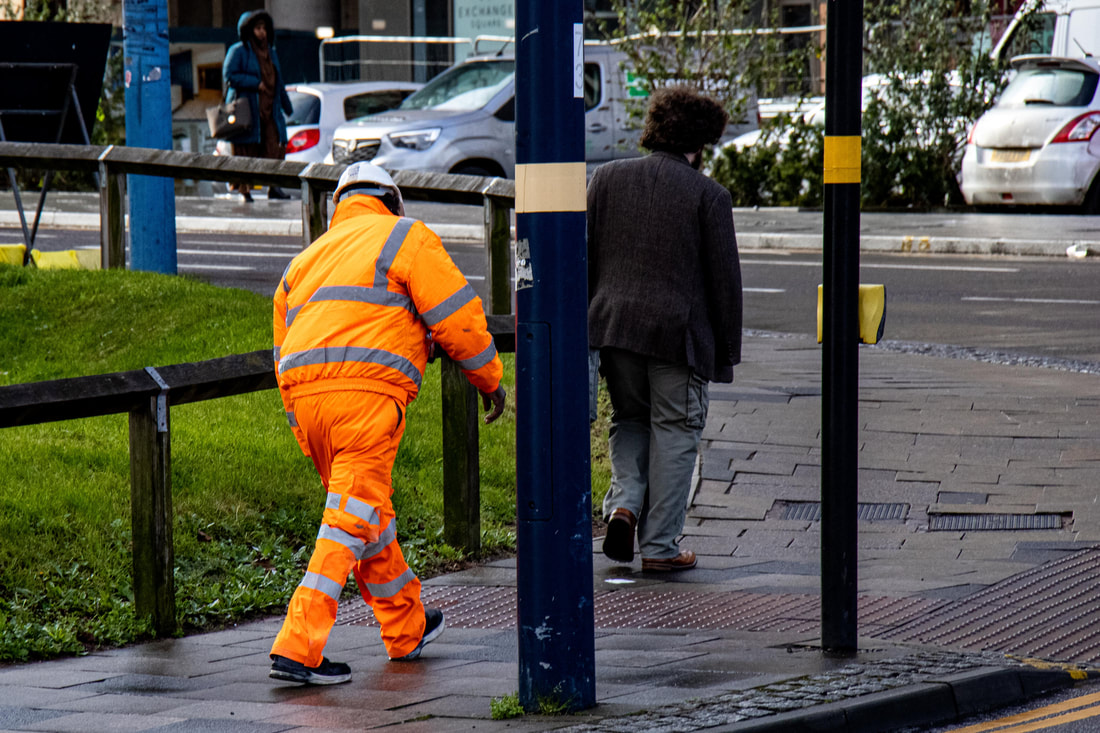   Between the both shoots, I think that the photographs shown below have to be my favourite. The reasoning behind this is that I really liked how the woman and the child appeared. I felt like it gave my series of images, some form of reality. Almost as though they are not just photos, they are a representation of the real life. I also really liked how the man on the bike looked. It was one of them photos that I literally took in the heat of the moment without thinking what I was doing and I think that really shows within the photograph. This could also link to my documentary photography which is shown in the photography genres page. EvaluationDuring the shoot, I really struggled with my own anxieties. I found myself really watching other people to ensure that they were not looking at me taking a photo. I didn't enjoy how it almost singled me out. But, looking back I now realise that no one was looking at me or singling me out as there were 10+ other students all doing the same thing as me, taking photographs. This is something which I need to focus on in the future. Me not having any reserves when it comes to taking images in public.
That being said, when I did have the confidence to take images of other people, I found that these images really shined and that I was really proud of them. The way in which I took the images of other people was similar to the work of Beat Streuli. I took the images, a fair distance away from the subject to make me feel less anxious. Along with the method of taking the photographs, I had a similar style of Philip-Lorca di Corcia which I tried to use within my images. I am not sure whether this worked out. In the future, I will try to make there to be a clear defined style that I want to use and I will stick to that style. What I liked about this shoot was the one main photograph which was the image of the woman and the child. This really brought a story to the photograph which ties into my documentary photography which I discussed in the Genres of Photography blog post. The image made me think that there was meaning behind the image, was it mom and daughter or was it nan and daughter. Clearly there was love between the two people but why? Why were they in Birmingham City Centre? What were they doing? These were all questions which I personally had whilst taking the image. This could be a variation of photography which I would like to delve further into as it intrigues me. But to do that I need to get over my own anxieties which I will work to do so. Therefore, I would personally classify this shoot as a successful shoot but I delved into different aspects of photography (Documentary, Architecture, Street). For this workshop we were introduced to the formal elements of photography that would make a black and white photograph stand out. These formal elements are lighting, texture, patterns, shapes, forms and lines. My tutor Emma, had shown us some of her previous work to inspire us. Then it was time for us to go out and take some photos ourselves whilst maintaining high levels of health and safety. Below is my contact sheet from the shoot. Below is the final series of images, after post-production.  On the 17th January 2022, we went around the college to really help us to look into all of the formal elements of photography. I walked around the college grounds looking for something which is high in contrast or had leading lines which is something which I thought would look good. As my tutor Emma was explaining all about how I should approach the activity, I was really looking forward to the activity. I felt like it was something which I could really get my teeth into. One thing which I did notice, was that it was very helpful to have the viewfinder in black and white. This enabled me to really fine tune how it would look in post-production. I really enjoyed the creativity of this activity as it allowed me to go down different routes within the college campus, potentially looking at areas in which other students may not have looked at. There was some parts of the shoot which didn't go well, which were when I was trying to shoot indoors. Now this was because I was too focused on the image and not the settings which I had put into the camera. This was simply human error as I probably got excited with the fact that I was taking photographs.
After having a quick session this morning, I realised that there was many more genres to photography than I thought. The vast range of photography is really inspiring, as many people just presume photography to be pointing a camera at something and taking a picture. But, there are more aspects and different ways to go down within photography, such as music, fineart, astrophotography and many others. To conclude the knowledge, I made a mind map of all the different genre's within photography.  For the assignment brief, we need to research different photography genres. So therefore, I have decided to research medical, night, abstract, documentary and underwater photography. Medical Photography Medical photography is the recording of accurate and detailed photographs for diagnosis, monitoring, teaching and researching of different medical illnesses and diseases. Alongside these recording of imaging, medical photography can be used within clinical trials to record their findings. Different ways of recording the information needed would include; thermography, 3D imaging, ultra violet imaging and digital photography. A medical photographer usually is apart of the institute of medical illustrators where they will work alongside medical staff, designers, graphic designers and video producers. A medical photographer must have a patients permission to photograph them using a patient consent form which allows the photographer to use the material when they need to without any repercussions off of the patient. The first known medical photographer was in 1840. Alfred François Donné originally took photographs of dentistry issues that a patient may face, therefore, Donné has photographs of teeth and bones. He did this in the Charité Hospital in Paris. The first known English medical photographer was Dr Hugh Welch Diamond (1809 - 1886). Diamond was a psychiatrist which worked within the Surrey County Mental Asylum where he took portraits of his patients to evaluate their current mental state. Diamond was the first clinician to use his photographs for diagnosis. He also used the photographs that he had taken for the diagnostic purposes and used them within therapy for the patients. To the right was the first ever photo to be taken for diagnostic purposes. Night Photography Night photography is the process of taking images during the night time. Night photographers can use a variety of different processes like changing the shutter speed, using artificial lights, changing the aperture and using urban lights. The first known photographers that began working at night in the early 1900's were Alfred Stieglitz and William Fraser. Even though they were the first photographers that began working at night, there was another photographer that worked at night was Brassai who published Paris de Nuit which translates to Paris at Night. The work was published in 1932.  My own work My own work Then further on in the 1990's Michael Kenna was recognised as the most commercially successful night photographer, he was known to take black and white landscapes of San Francisco, Japan, France, and England. Now, there are many websites and Instagram pages dedicated to night photography due to the commercial factor of digital cameras. Abstract Photography An abstract photograph is when you allow a visual image to not have an obvious association to any objects that are known to people. Personally, I love abstract photography as it allows me to have creative control over what I would like to take a photo of.  My Own Work My Own Work The earliest examples of abstract photography was made in 1842, which was created by the scientist named John William Draper who produced scientific images using a Spectroscope. Since the first example of abstract photography there have been many developments like the cyanotypes, photograms and digital photography. One contemporary artist which I personally love is Ola Kolehmainen who photographed the "L'Hotel" which was created in 2002 and sold for CHF3250. This photograph is shown above. Documentary Photography Documentary photographs are factual series of images or single image used to tell a story or feeling. The photos can be taken in chronological order. The photos can be taken for historical events, political moments, and everyday life. The earliest known documentary photographer was Philip Delamotte (1821 - 89)who photographed important events such as the Disassembly of Crystal Palace. Later on, another photographer named Francis Frith (1822 - 98) took documentary photographs whilst he was travelling. Finally later on Roger Fenton was known as the most prolific war photographer known to date where he spent thousands of dollars putting teams of creative people together to photograph different aspects of the war. Overall as a big team of creative people they took over 7000 negative photographs during the Civil War. My Own Work Underwater Photography Underwater photography is pretty self explanatory. It is where you take photographs under water. Usually the photographs are taken whilst swimming, snorkelling, scuba diving, in a submarine, or used by a device that takes photographs for you. The first photos that was taken was by William Thompson in 1856 in Weymouth Bay in the United Kingdom using a box with a separate shutter which was activated from a boat above the camera. Thompson was very interested in marine life, so he used his passion and documented it. This being said, the first official underwater photograph was taken by biologist and diver Louis Boutan where he had discovered the flash after finding out that underwater was too dark for his camera to pick up. He created the flash by attaching a alcohol lamp to a barrel and then putting magnesium over the top of the lamp to create a light source to allow the photographs to have an actual image displayed within the photo. ReferencesAcademic Dictionaries and Encyclopedias. 2022. Night photography. [online] Available at: <https://en-academic.com/dic.nsf/enwiki/3147703> [Accessed 23 January 2022]. Evans, M., 2021. The 10 Best Underwater Photography Tips. [online] Scuba Diver. Available at: <https://www.scubadivermag.com/10-top-tips-to-improve-your-underwater-photography/https://www.scubadivermag.com/10-top-tips-to-improve-your-underwater-photography/> [Accessed 23 January 2022]. Ford, C., 2022. Exploring Abstract Photography: History, Philosophy, Inspiration. [online] Photodoto. Available at: <https://photodoto.com/exploring-abstract-photography/> [Accessed 23 January 2022]. Gregg, R., 2022. The Beginner's Guide to Documentary Photography -CreativeLive Blog. [online] CreativeLive Blog. Available at: <https://www.creativelive.com/blog/documentary-photography/> [Accessed 23 January 2022]. H2Ography. 2018. Through The Lens: A Look Into The History of Underwater Photography. [online] Available at: <https://h2ography.com.au/history-of-underwater-photography/> [Accessed 23 January 2022]. IdeelArt.com. 2022. IdeelArt | The online gallerist. [online] Available at: <https://www.ideelart.com/magazine/abstract-photography-tate> [Accessed 23 January 2022]. Illingworth Research Group. 2022. What is Medical Photography? - Illingworth Research Group. [online] Available at: <https://illingworthresearch.com/what-is-medical-photography/> [Accessed 23 January 2022]. Lentini, J., 2022. What Equipment Do You Need for Underwater Photography?. [online] Nature TTL. Available at: <https://www.naturettl.com/equipment-underwater-photography/> [Accessed 23 January 2022]. Masterclass. 2022. https://www.masterclass.com/articles/how-to-start-shooting-night-photography. [online] Available at: <https://www.masterclass.com/articles/how-to-start-shooting-night-photography> [Accessed 23 January 2022]. Milam, E., 2016. A Brief History of Early Medical Photography – Clinical Correlations. [online] Clinicalcorrelations.org. Available at: <https://www.clinicalcorrelations.org/2016/09/30/a-brief-history-of-early-medical-photography/> [Accessed 23 January 2022]. National Science and Media Museum blog. 2022. D is for... Dr. Hugh Welch Diamond: Photography and the pseudoscience of physiognomy - National Science and Media Museum blog. [online] Available at: <https://blog.scienceandmediamuseum.org.uk/a-z-photography-collection-hugh-welch-diamond/> [Accessed 23 January 2022]. Nationalgalleries.org. 2022. Documentary photography | National Galleries of Scotland. [online] Available at: <https://www.nationalgalleries.org/art-and-artists/glossary-terms/documentary-photography> [Accessed 23 January 2022]. Tate. 2022. Documentary photography – Art Term | Tate. [online] Available at: <https://www.tate.org.uk/art/art-terms/d/documentary-photography#:~:text=Documentary%20photography%20is%20a%20style,on%20the%20bed%2C%20NYC%201982> [Accessed 23 January 2022]. Underwater Photography Guide. 2022. Guide to Underwater Photography. [online]Available at: <https://www.uwphotographyguide.com/> [Accessed 23 January 2022]. Visual-arts-cork.com. 2022. Documentary Photography: Characteristics, History. [online] Available at: <http://www.visual-arts-cork.com/photography/documentary.htm> [Accessed 23 January 2022]. Whoop whoop! It's nearly Christmas! Food photography is a part of still life photography which is widely used for commercial photography. This specific type of photography you will easily see all over Instagram, Pinterest and virtually everywhere. From magazines to advertisements, food photography is essentially making food look as appealing as you can to almost pose a picture perfect image. This has its downfalls with fast food companies exaggerating how big/attractive a food item is. For my next shoot we were introduced to food photography and what a perfect time it was to take photos of food when it is coming up to Christmas. So off to Pinterest I went to scan the whole of the site for some images which I like for my own influence for my images that I will take. A link for my Pinterest board is here.
 I followed all health and safety practices and this is therefore shown within my health and safety risk assessment.
Below is the contact sheet for the shoot on the day that I took the photos.  Now it was editing time, I edited some of the scratches in certain places just to ensure that the image looked as good as possible. ConclusionFor this shoot, I was not happy with how it turned out at all. I just think I could have come up with a better composition to allow the photo to really shine. I don't feel like the photos made the food look appealing to a viewer. I feel like the image isn't very tasteful. One thing that I did like was that I problem solved when taking the photo. I noticed that on the left hand side the image was pretty dark creating shadows which did not look good. To counteract that I added a reflector to reflect the light to lessen the shadows which made the photo appear a bit better than I originally had thought. I think that food photography is not a type of photography that I like. I think that I am not very good at it therefore this means that I won't be re-doing it unless I need to for a job or studies in the future. However, if I had to re-do this in the future, I would pick a completely different food. I would most likely pick a cake or a drink or something along that theme as these to my own eye appear more interesting and can lead a viewers eye to different aspects of the food in a more flowy manner.
Product photography is generally where a company would like to sell a product and it needs photos to help advertise their own products. Before deciding what photos that I would like to create, I decided to create a pinterest board so I could get a feel for what I would like to do. Here is a link to the pinterest board and a screenshot of the board is shown below.  Now, it was time for me to really think about what I would like to have done. I soon found that I really liked how the painting with light looked within images and I wanted to recreate it with my own image. But before getting into the doing, I needed to set up the studio with Emma, my tutors help. Initially, we set up the studio background being black and we put two lights either side of the table, with a reflective black plate on top of the table. Below is a diagram of the set up that I had for the shoot.  Now it was time for me to shoot the photos that I wanted. Below is a contact sheet of what images I actually took.  I followed all health and safety practices and this is therefore shown within my health and safety risk assessment.
Whilst I was shooting I didn't expect them to look very good. But when I uploaded the pictures to the Mac I was amazed. It would be very effective for an advertising company to use this for their adverts as it makes people stand and look at the photo. ConclusionIn conclusion, I really like product photography, it made me think about trying to keep on doing the product photography for potentially small businesses if they would have me which I have asked some small businesses for the opportunity. For the whole shoot there was only 1 image which I liked myself which was the one that I showed the before and after for. Therefore, I am not sure if it was a successful shoot. At first I used the smaller torch for the painting with light and I didn't like the effect that it created. It didn't captivate me like the larger torch did. My research really influenced what my idea was going to be with one of the images that I had saved in my Pinterest board, having the idea of the torch with the colour gel over the top of it but swirling around the product almost to bring your focus directly into the product. I learnt that I need to start to really think about the composition of my photos, ensuring that I have attention to the smaller details. For example, I had to edit out some dirt that was on the mirror which would have made my own life easier when coming to edit thus reducing the production time for the photos which would help in the future if I ever go into industry. If I had to do this again, I would tie the torch onto a piece of string and hang it from something above to hopefully make the painting with light be more fluid therefore making the image appear better and easier to look at for a viewer. Additional informationAfter editing the image, I uploaded it to my Instagram page where Lynx themselves liked and commented on my images where they asked me to adapt the image for it to be placed into their Christmas advert. Unfortunately, I could not complete this on time. But I still thought it was cool for Lynx to have seen the photographs.
Colour Gels are sheets of a transparent coloured material that can be used within photography, film, theaters and many more. Generally, colour gels are made up of polycarbonate or polyester. The colour gels are used to portray different feelings to an image, for example, blue is generally used to portray a sadness and red is used to create anger or love. More about the psychology behind colours are in my Colour Theory blog post. After reading a Sway made by my tutor Emma. (Jukes, n.d.) It was then time for me to have a look at some potential ideas that I would have liked to create for my colour gels. So, I put together a Pinterest board of images that I liked and would want to either recreate or use some ideas from. In my previous studies, I have witnessed other students use colour gels for their images. Also the link for my Pinterest board is here.  Now, it was time to actually go into the studio and essentially play with the type of photography. Whilst keeping in mind colour theory. So, firstly we went to the red backdrop side and tried to play around with complimentary colours and harmonious colours. Below is a lighting diagram of how the set up for the colour gels was.  After being shown how to use the colour gels to display certain feels to a photograph, it was now time for us as a small group to have a go at a shoot. I followed all health and safety practices and this is therefore shown within my health and safety risk assessment.
Shown below is my contact sheet for my shoot. Then it was time to edit the pictures that were taken. One mistake that I did notice was that the images were taken in a JPEG format meaning that not a lot of editing could actually take place. Which is something that I needed to be aware of when editing. When composing the images, I had to really think about what part of the colour theory I wanted the image to be of. For example, the top two images are monochromatic and the bottom image was a tetradic colour scheme. Personally, I feel like I prefer the tetradic colour scheme more than the monochromatic colour scheme. Conclusion If I am completely honest, I don't like this colour gel shoot. I don't think that it was a very good shoot. I don't know whether the colours complimented each other within the photos. Especially with the two pinky/purple colours. The last picture, has a different feel to the photo in comparison to the others. The top two images I like the exposure on, But the bottom image, could have been exposed more. But, again if I wanted to create a halloween feel to the image, it would have been a perfect exposure. If I am completely honest again, I should have looked at the exposure at the time when I took the image and increased the aperture to increased the exposure within the image. But again, if it was a halloween feel to the image, the exposure would have been perfect. ReshootAfter looking at my final work, I decided to do another shoot. This shoot came out like this:      I think this shoot was significantly better. I think the colours complimented each other a lot more than the original shoot.
|
|||||||||


